


Air Fryer Eggs are one of the easiest and fastest ways to make a perfect breakfast without boiling water, dirty pans, or complicated cooking methods. Whether you want soft-boiled eggs with a jammy yolk, fluffy scrambled eggs, or sunny-side-up eggs with crispy edges, an air fryer gives you consistent results every time. With precise temperature control and circulating heat, Air Fryer Eggs turn a simple ingredient into a versatile meal option that works for busy mornings, meal prep, and healthy eating.
- Preheat the air fryer for non-boiled methods to ensure even cooking and prevent sticking.
- Cook eggs in appropriate vessels—ramekins, silicone molds, or pans—for fried, scrambled, omelet, or poached styles.
- For hard or soft "boiled" eggs, air-fry pierced, room-temperature eggs at ~270°F then ice-bath immediately for easy peeling.

Absolutely, this appliance excels beyond simple frying, producing everything from flawless hard-boiled specimens to delicate poached pouches without a pot of water. The rapid, circulating heat offers precise control, turning a basic ingredient into a culinary cornerstone for meals any time of day.
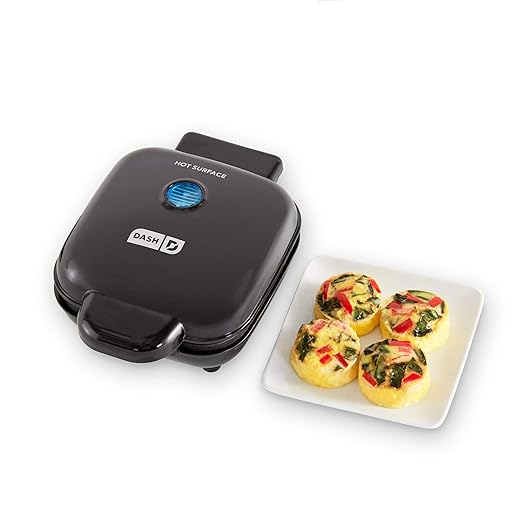
For perfect soft-boiled results with a set white and runny yolk, place cold, large specimens directly into a preheated basket at 270°F for 10-12 minutes, then immediately submerge in an ice bath. A versatile accessory like the Dash Deluxe Egg Bite Maker (available on Amazon) transforms the process further, enabling effortless poached or scrambled egg bites infused with cheeses and vegetables.
Move beyond the basics to craft a fluffy omelette in a parchment-lined pan or achieve a sunny-side-up finish with crisp edges. The technique even simplifies baked dishes, such as crustless frittatas, and offers a clever hack for filling deviled eggs–simply air-fry the whole eggs first for shells that peel effortlessly. This method guarantees consistent outcomes, revolutionizing a fundamental kitchen staple.
Forget boiling water. Achieve consistent, easy-to-peel hard-boiled results by placing large, room-temperature ovals directly onto the appliance’s rack. Set the temperature to 270°F (132°C) for 15 minutes, then immediately transfer to an ice bath. This method prevents the dreaded green ring around the yolk.
Scrambled varieties excel in a small, oven-safe dish. Whisk two whole units with a tablespoon of milk, then pour into a greased container like the Emile Henry Mini Pie Dish. Run the convection oven at 320°F (160°C) for 8-10 minutes, pausing halfway to stir for ultimate fluffiness.

Emile Henry Mini Pie Dish (Set Of 2) | Twilight
Sunny-side up perfection requires a preheated basket. Lightly coat a non-perforated pan, such as the 18 PCS Air Fryer Accessories, with oil or butter, crack the shell into it, and slide it into the hot chamber. 300°F (150°C) for 4-5 minutes yields a set white with a runny center.

18 PCS Air Fryer Accessories, 8 Inch XL Deep Fryer Accessories Compatible with Gowise USA Phillips Ninjia Cosori Cozyna Air Fryer, Fit 3.6QT- 6.8QT Air Fryer...
Create a personal-sized folded omelet by beating two with fillings like cheese and diced ham into a similar small pan. Process at 300°F for 10-12 minutes, checking for doneness at the 10-minute mark. No flipping is typically needed.
For a baked or “cloud” style, separate whites from yolks. Whip the whites to stiff peaks, form a nest on parchment, and create a well for the yolk. Bake at 370°F (188°C) for 5-6 minutes until the whites are golden.
Always preheat the appliance for non-boiled methods to ensure immediate cooking and prevent sticking. Adjust times by 1-2 minutes based on size; a jumbo requires more time than a medium. Silicone molds are indispensable for mess-free preparation.
Air Fryer Egg Cooking Methods: Step-by-Step Instructions
Begin with a preheated appliance, typically 270°F (132°C) for most techniques, ensuring consistent results.
For a classic hard-boiled outcome, place large, room-temperature specimens directly on the basket. Process for 15-17 minutes at 270°F, then transfer immediately to an ice bath. The Dash Rapid Egg Cooker is a popular alternative, but this countertop convection method is remarkably efficient.

DASH Electric Rapid Egg Cooker for Hard Boiled/Poached/Scrambled Eggs or Omelets with Auto Shut-Off Feature, Black, 7 Egg Capacity
Achieving a perfect soft-boiled version requires precision: 9 minutes at 270°F for a runny yolk with a set white, followed by a brief cool in water.
Master the sunny-side-up style by cracking contents into a lightly greased, heat-safe ramekin or small pan, like those from the Ramekins Set with 6 Silicone Lids. Run for 4-6 minutes at 270°F until the white is fully set.
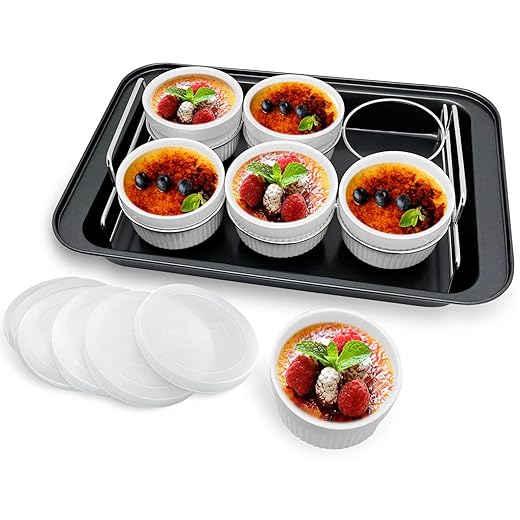
Ramekins Set with 6 Silicone Lids, Mothers Day Gifts Creme Brulee Making Set, Set of 6 Porcelain Ramekins, Oven Safe Covered Bowls & Soufflé Ramiken
Create a poached masterpiece by adding two tablespoons of water to a small oven-safe dish, cracking the specimen inside, and heating for 4-5 minutes. The porcelain Pinch of Nom Poach Pods work excellently for this.
Whip scrambled breakfast by beating two specimens with a tablespoon of milk or cream in a greased pan suitable for the appliance. Heat at 300°F (149°C) for 8-10 minutes, pausing to stir halfway through.
Construct a simple omelette by pouring beaten, seasoned mixture into a greased, round 6-inch cake pan. Process at 300°F for 10-12 minutes, adding fillings like cheese or diced ham halfway.
Transform hard-boiled results into deviled delights: slice cooled specimens lengthwise, mix yolks with mayo, mustard, and paprika, then pipe back using a tool like the Cuisipro Decorating Bag Set.

RFAQK 74 PCs Icing Piping Bags and Tips Set, Cake Decorating Kit with 48-Numbered Piping Tips, Anti Burst Pastry Bags for Cookie Cupcake Cake Decoration,...
How to Make Perfect Hard-Boiled or Soft-Boiled Eggs
Place large, refrigerated ovals directly into the basket. No preheating is necessary.
For a solid, fully set yolk ideal for salads, use this precise technique:
- Set the appliance to 270°F (132°C).
- Process for 15 minutes.
- Immediately transfer to an ice bath for 5 minutes to stop cooking.
For a runny, jammy center, follow these parameters:
- Set the temperature to 250°F (121°C).
- Process for 9-11 minutes (9 for very runny, 11 for jammy).
- Cool briefly in water for easier peeling.
Essential tips for consistent results:
- Use a silicone liner or rack (like the COSORI Air Fryer Silicone Pot) to prevent rolling.

Air Fryer Silicone Liners for COSORI Air Fryer 9-in-1 5QT 5.8QT 6QT 6.8QT,2 Pcs Reusable Square Airfryer Liners for Ninja/Instant Pot Vortex Plus/Paris...
- Piercing the wider end with a simple egg piercer avoids cracks.
- Altitude significantly affects timing; increase by 1-2 minutes above 3,000 feet.
Peeling is easiest when the steamed shells are cracked and rolled under cool running water immediately after the ice bath.
Scrambled Eggs in a Ramekin: Avoiding a Mess
Utilize a small ceramic dish, like the Le Creuset Petite Ramekins, for flawless, contained results. This technique prevents mixture from dripping through the appliance’s basket.

Le Creuset Stoneware Round Ramekin Straight Wall Set of 2, 7 oz. Each, Artichaut
Essential Preparation:
- Generously grease the interior of the ramekin with butter or oil.
- Whisk two large eggs with one tablespoon of milk or cream and seasoning.
- Pour the mixture into the prepared vessel, filling no more than halfway.
Optimal Technique:
- Set the appliance to 300°F (150°C).
- Place the ramekin in the basket and heat for 8-10 minutes.
- Pause at the 5-minute mark to stir vigorously with a fork.
- Continue heating until the eggs are just set, slightly creamy.
This method yields a perfect single-serving for topping toast or filling for deviled eggs. For a variation reminiscent of poached, crack a whole egg into a greased ramekin, add a spoonful of water, and heat at 320°F (160°C) for 6-8 minutes until the white is set.
Cooking Sunny-Side Up or Over-Easy Eggs
Utilize a small, heat-safe dish like a ramekin or a silicone muffin cup to contain the yolk and white. A product like the “Lekue 2-Pack Silicone Egg Poacher” works perfectly for this application.

Lekue Poached Egg Maker/Poached Egg Cooker Set of 2, Orange
Preheat the appliance to 270°F (132°C). This lower temperature is crucial for gentle, even heating without instantly solidifying the delicate yolk.
Lightly grease the chosen vessel with butter or oil. Crack a fresh ovum into it. For over-easy, carefully pierce the yolk’s surface with a toothpick to prevent bursting during the flip.
Place the dish into the preheated basket. Set a timer for 4-5 minutes. The goal is a set white with a runny, glossy center. For a flipped version, at the 4-minute mark, use a small spatula to carefully turn the ovum and heat for an additional 30-60 seconds.
| Style | Temperature | Time | Key Tip |
|---|---|---|---|
| Sunny-Side Up | 270°F / 132°C | 4-5 min | No yolk puncture. Use a “Dash Deluxe Egg Bite Maker” mold for easy removal. |
| Over-Easy | 270°F / 132°C | 4 min + 1 min | Puncture yolk before initial cook for safety. Flip with a thin silicone spatula. |
Ha! The true test is the jiggle. Remove the vessel when the white is fully opaque but the yolk still wobbles. Residual heat will continue the cooking process slightly, so account for carryover.
Season finished ovum directly in the vessel with salt, pepper, or a dash of hot sauce. Slide onto toast directly from the mold for a pristine presentation. Cleanup is a breeze with non-stick silicone.
Creating a Fluffy Folded Omelet
Preheat the appliance to 320°F (160°C). Thoroughly whisk two large units with one tablespoon of milk or water, plus a pinch of salt, until completely uniform.
Pour the mixture into a lightly greased, heat-safe dish that fits inside the basket, like the Lodge 6.5 Inch Cast Iron Skillet or a ceramic pie plate. This ensures even heating and easy removal.
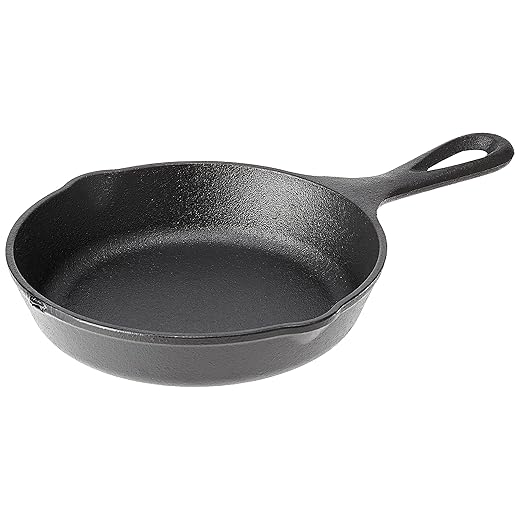
Lodge Wildlife Series - 6.5" Cast Iron Skillet with Wolf Scene
Slide the dish into the preheated chamber. Set the timer for 8-10 minutes. Avoid opening the basket during the first 7 minutes to prevent collapse.
Check for doneness when the center is just set and the top appears dry. Add shredded cheese, diced ham, or sautéed vegetables to one half.
Using a silicone spatula, carefully fold the empty half over the fillings. Let it rest inside the turned-off unit for one minute to melt the cheese before serving directly from the dish.
Baking Eggs in Avocado or Portobello Caps
Transform these natural vessels into single-serving breakfasts with a convection oven’s rapid, circulating heat. This technique yields a set white and a runny yolk, contrasting beautifully with the creamy or earthy base.
For avocado halves, first scoop out a tablespoon of flesh to enlarge the pit cavity. Place them in a compatible basket or dish, like the GoWISE USA 7-Quart Air Fryer basket, to prevent tipping. Crack one large egg per half, seasoning with salt, pepper, and smoked paprika. A temperature of 320°F (160°C) for 10-12 minutes achieves a perfect sunny-side-up consistency.

GoWISE USA 7-Quart Air Fryer & Dehydrator MAX STEEL XL- with Touchscreen Display with Stackable Dehydrating Racks with Preheat & Mute Functions + 100 Recipes...
Portobello mushrooms require preparation: remove the stems and gills using a spoon. Lightly brush both sides with oil and pre-roast caps alone at 370°F (188°C) for 5 minutes to release moisture. After patting dry, crack an egg into each cap. Increase cooking time to 12-15 minutes at 320°F for a set white. For a firmer yolk akin to a boiled egg, extend time by 3-5 minutes.
Critical pro-tip: slightly underfill the vessels to prevent spillover. A silicone muffin pan, such as the Chefmade Silicone Egg Bite Mold, provides essential stability for uneven avocado skins and keeps mushroom juices contained.

Sakolla 2 Pack Silicone Egg Bite Molds for Air Fryer, Nonstick 7 Cups Air Fryer Muffin Pan for Baking Egg Bite, Mini Muffins, Tart, Mini Cupcake and Quiche...
Question-Answer:
Is it safe to put raw eggs in the air fryer, shell and all?
Yes, but with a critical step. You must pierce the wider end of the egg with a thumbtack or egg piercer to create a small vent hole. This allows steam to escape during cooking. Without this hole, pressure builds up inside the shell and the egg can explode, making a significant mess in your appliance. Always cook pierced eggs immediately after piercing.
What’s the best method for making hard-boiled eggs in the air fryer?
For hard-boiled (or more accurately, air-fried) eggs, the method is very consistent. Place pierced, room-temperature eggs in a single layer in the basket. Cook at 270°F (130°C) for 15-16 minutes. Immediately transfer the cooked eggs to an ice water bath for at least 5 minutes. This stops the cooking process and makes peeling much easier. The result is a perfectly set yolk with no gray-green ring.
Can I make fried eggs or scrambled eggs directly in the air fryer basket?
You can, but it’s not ideal for a runny yolk. For a fried egg-style result, use a small, heat-safe dish or silicone mold placed inside the basket. Crack the egg into it. Cooking at 370°F (190°C) for about 4-5 minutes should yield a set white and a runny yolk. For scrambled eggs, always use a dish. Whisk eggs with a bit of milk or cream in the dish and cook at 320°F (160°C), pausing to stir every 2-3 minutes until they reach your preferred consistency.
My air-fried eggs are hard to peel. What am I doing wrong?
The peeling difficulty often links to the eggs being too fresh. Older eggs peel more easily. Ensure you are using the ice water bath immediately after cooking; the rapid cooling contracts the egg inside the shell, creating a gap. Also, gently crack the egg all over and start peeling from the wider end, where the air pocket is. Rolling the egg on a counter to crackle the shell thoroughly can also help.
How do cooking times change for soft-boiled versus hard-boiled eggs in the air fryer?
Time and temperature are key for yolk consistency. For a runny soft-boiled egg, cook pierced eggs at 250°F (120°C) for 12-13 minutes, then place in an ice bath. For a jammy, medium yolk, use 270°F (130°C) for 13-14 minutes. For a fully set hard-boiled yolk, use 270°F (130°C) for 15-16 minutes. These times assume large, room-temperature eggs. Adjust by a minute for very cold or extra-large eggs.
Can you really cook a whole, raw egg in its shell in an air fryer?
Yes, you can cook whole eggs in the shell using an air fryer, essentially making hard or soft “boiled” eggs. The method is straightforward. Preheat your air fryer to 270°F (132°C) for a few minutes. Place the eggs directly in the basket, leaving space between them. Cook for 15-17 minutes for hard-cooked eggs with fully set yolks. For a softer, jammy yolk, reduce the time to 10-12 minutes. Once done, immediately transfer the eggs to an ice water bath for at least 5 minutes to stop the cooking process and make peeling easier. The result is perfectly cooked eggs, though cooking times may vary slightly based on your specific air fryer model and the size of the eggs.

